Activity Feed › Forums › Where should I start – Post drawings and questions › Troy’s floor plan
-

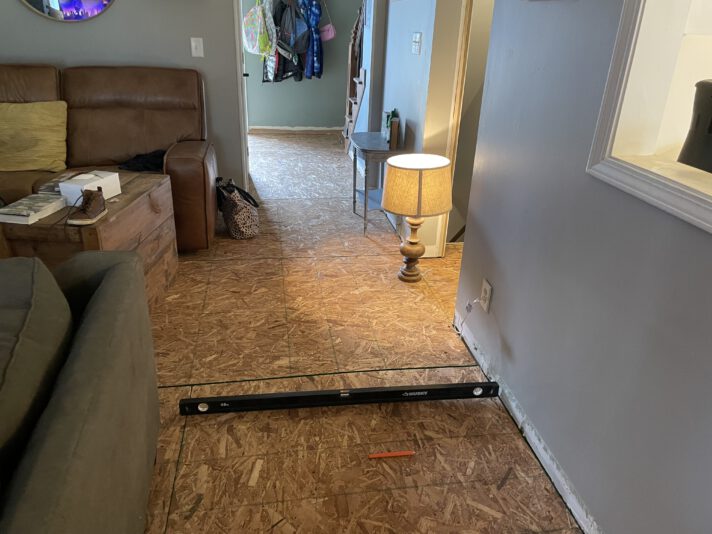
Squeaking area
-
Ok, so the plan is to start laying floor tomorrow!
Tonight, I’m putting down the He Ty’s 549 in cracks and low spots.
•one spot in particular seems really bad and I’ve included some photos to show you my plan to see what you think.
•there is a high spot and i think what I’m going to do is add this 549 on each side. Initially one side (closest to this wall and walkway to the kitchen ) looks really bad but I put down screws up to the height where it made the bubble in the level perfect. This way, I know exactly how much of the 549 compound to place and level off to the screw height. Does this make sense?
This is probably the worst area so I’m hoping once this is done, it’s smooth sailing to laying floor tomorrow!

-
•Thanks, Joe! I’m really looking forward to laying this flooring down, but does not seem like I’m ever going to get there lol. I went through that whole box of Henry’s 549 and it looks like I might need one or two more boxes. Here is what I’ve done so far. <div>• so at the bottom landing of our stairs, there was a lot of crud/glue/adhesive buildup from the previous owners having removed some brick. I started to sand it, and it was turning into a hot gooey mess. So instead, I chiseled and used my multi tool to take out all of the large chunks and make it smooth. I’ll show you the before and after. Think this is good enough to lay plank over? I have to lay Henry’s 549 and smooth out this joint here where it meets up with the OSB and I can always skimcoat a little, but for the most part everything is smooth . </div>
Here’s sopping to eventually get to laying the floor this weekend!
-
Good morning Joe, hope you and that knee are coming along well. I’m fighting a sickness, but trying to muster up the energy to continue this floor leveling process so I can start laying my floor this weekend!<div>
</div><div><div>I wanted to ask your opinion on leveling. I know this probably sounds like a dumb question but how perfect are you trying to get the floor? I feel like I’m having a difficult time using the 549 product and it is not going as far as I had thought it would. I’m on my fifth box! Lol. </div><div>I’m also addressing several areas throughout my floor plan and not just one area so I guess I have to take that into consideration. I’m just wondering if I should be stressing over the slightest dips or just paying attention to the bigger ones? It’s amazing how you can walk through the floor and everything seems nice and flat until you get down there with a level and you see the imperfections!</div></div> -
Hey Joe,
I’m trying to find my starting point for tomorrow and Im a little nervous.
•I took three points, 29 inches off my bottom step and made a mark near the wall. I then did the chalk line method first and snapped a line starting on the first mark making sure I was hitting all three marks.
Just out of curiosity, I threw a laser line on the first mark, making sure it went through all three points as well and ended up about a good inch or so off compared to my snapped line. I wonder why there is such a discrepancy? Maybe I did not do a good job of snapping the line and making sure all points were met?
I included a photo showing you the difference between my blue chalk line and the green laser line
-
Joe, would i want to install my new threshold now, before laying my new plank down?
-
Ok I may have found the answer. It says it covers up to a 5/8″ gap. The gap underneath my door to subfloor is 3/4″ and with plank it is 5/8″. So looks like installing the plank all the way through the underside of the door into the garage is the way to go, then installing the threshold on top?
-
OK, thank you Joe. That makes a lot of sense.
I will use that idea of cutting a “scrap” piece first to put the threshold down so it isnt part of my actual floating floor. I’ll just use a piece of the plank to cut and go from the threshold to the edge of the step and cover the edge with a piece of stair edge to match the threshold.
Thanks again for the help with the starting line yesterday. Between that, and rewatching the course videos, I have a nice concrete plan for this week!
Hope that knee is healing up well.
-
Ok.
So I have a plan for starting my first row. You can tell me if I’m on the right track.
The blue line is my snapped line. I took a measurement 32 1/2 inches away from my front wall, both near the door and further down into the playroom and snapped a line between these two. (I chose 32.5 because when i laid out my
Planks in front of the steps, the distance from the wall to the end of the 3rd plank was roughly 32.5” so i knew i wanted it to be there).
Once I had my line snapped at 32 1/2 inches away from the wall , I measured from the back wall at each end as well. I was only about a quarter inch off. Is that acceptable?
-
Couple of updates:
1.) I can see what you mean by this threshold. I installed it over a scrap piece of plank so I could extend it out to the edge of the subfloor that sticks out into the garage. However, it is too tall and when the vinyl is in the track, I cannot close the door! My door is wood so I guess I could take it off and trim the bottom however Id rather not. And I cant take the plank out from underneath and just place on subfloor because then my floor wont look right butting up against the inside of the threshold. I think I would be better suited to buy the inswing threshold you recommended.
2a.) When measuring my first three rows to the snapped chalk line, are you just measuring from the edge of the groove and not really worried about placing the tape measure on top of the groove (to the finished surface)? It seems we are just concerned that the row itself is lined up with the line the entire way down the wall. I only ask because there has been an emphasis in the course videos about where to place the tape measure when measuring plank widths.
2b.)And After I secure my first three rows, Am I still concerned with measuring to a line or does this pretty much set the path for you and keep you in line once the first three rows are locked in? Maybe it is most important when going around a wall or into a closet area where you can go off from your line?
3.) my 3rd row will be going around the wall/closet as shown. If I’m doing a Left to Right install, starting at my garage door, would I use the bridging method, mark the closet entryways with a cheater board, cut my board, and then just continue the rest of the row down the wall AFTER putting the cut plank in place? Hopefully that question makes sense.


Log in to reply.