Find answers, ask questions, and connect with our community here!

Activity Feed Forums Floor Prep Build up Subfloor to Match ex. Hardwood Floor Height – Oli and Summer

  • Build up Subfloor to Match ex. Hardwood Floor Height – Oli and Summer

    Posted by Oli & Summer on November 5, 2022 at 11:16 pm

    Hello Joe,

    Thank you very much for all your amazing videos and building this fantastic Laminate University! Could you please help us with the following questions regarding prepping subfloor for LVP installation (each plank is 60″x9″, 5mm SPC Core + 1.5mm IXPE pad)?

    Background:

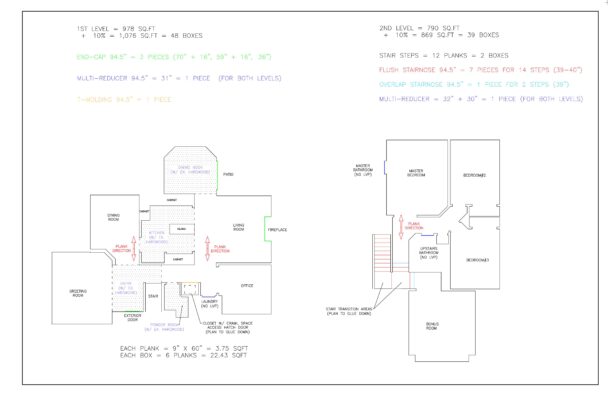
    – We have ex. OSB subfloor for the 1st level. There are ex. hardwood floors in the entry area, kitchen, dining nook, and powder room (please see the attached floor plan that we created before).

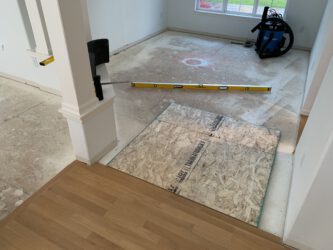
    – We have removed the carpet and are planning to add a 23/32″ OSB underlayment to match the ex. hardwood floor height (see the attached photos). This way we can avoid lowering all interior door frames and the mess of removing ex. glued-down hardwood floor. We have checked the exterior door clearance per your instructions.

    Questions:

    1. Should we leave a gap between the new OSB underlayment sheets and ex. hardwoods/walls?

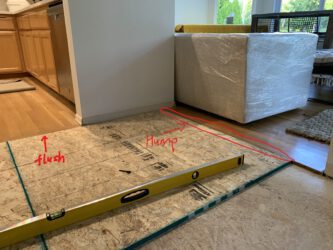
    2. We bought a 4×8 test OSB piece and cut it into half in the store. After screwing it down next to the ex. hardwood, we found that the factory edge is thicker and became a hump. But the new cut edge is pretty flush with the ex. hardwood (see the attached photo). Is it better to sand down the new OSB sheet joints with an edger sander before working on any dips? Which grit sandpaper is recommended?

    3. With ex. 3/4″ subfloor and new 23/32″ OSB underlayment, would 1/4 in. x 1-1/4 in. staples be enough? How much PSI for the air compressor? Will the staples affect any needed sanding if there are any humps in the new OSB underlayment?

    4. We have some minor dips in the ex. hardwood floor (about 1/16”) within a 6’ radius (see the attached photo). This meets the LVP specs. Is it worth just filling these dips with Henry 549 while doing all the prep work?

    Thank you very much!!

    Oli and Summer

    Joe replied 1 year, 3 months ago 2 Members · 21 Replies
  • 21 Replies
  • Oli & Summer

    Member
    November 6, 2022 at 12:37 am

    Sorry Joe, just watched some of your reply videos to other members’ questions and came out another question.

    5. There was one reply you mentioned to spread a bead of the construction glue every foot of the 1/2″ plywood sheets. Would our case need the glue too? 23/32″ OSB sheets are pretty heavy. Would they move around after stapling down?

    Thank you again!

    Oli and Summer

  • Joe

    Administrator
    November 7, 2022 at 1:14 pm

    You will be good to go witbout glue if stapling.

  • Joe

    Administrator
    November 8, 2022 at 9:59 am

    Here is a video answering your questions – https://somup.com/c3Xjo9vHFu

    Here is the video I mentioned – https://laminateuniversity.sothatshowyoudothat.com/start-one-room-installation/

    • This reply was modified 1 year, 4 months ago by  Joe.

    Where to start in a one room installation

    • Oli & Summer

      Member
      November 15, 2022 at 10:14 pm

      Hello Joe,

      Thank you very much for all the answers!!! And you were correct – Oli is pronounced as “oh-lee”.

      We have finished adding 23/32″ OSB underlayment in the greeting room, dining room, and living room for the 1st level. All the tools you recommended are sooooo needed. Thank you again for sharing all these gems!

      Next, we are going to add the OSB underlayment to the hallway, which connects to the laundry room where we just installed tiles (see the attached photos).

      • Tile to subfloor is 26/32″
      • OSB underlayment 23/32″ + LVP plank 8/32″ = 31/32″
      • The height difference is about 5/32″
      1. Would we need to leave a gap between the OSB underlayment and the tile?
      2. We haven’t received the T-molding or the Reducer yet and couldn’t test it out. For 5/32″ height difference, which one would you recommend based on the products you have been seeing? Please the attached product dimension.
      3. If using T-molding, it should be glued down to the OSB underlayment, correct? So the gap between the OSB underlayment and the tile can’t be too big, correct?
      4. If using Reducer, we can glue it down to the LVP planks?

      Thank you very much!

      Oli and Summer

      • This reply was modified 1 year, 4 months ago by  Oli & Summer.
  • Joe

    Administrator
    November 16, 2022 at 5:12 am

    A T molding would be best for this situation and yes, I would glue it to the subfloor. You do not need to leave a gap between the osb and the tile.

    • Oli & Summer

      Member
      November 18, 2022 at 12:37 am

      Hello Joe,

      Hope you are enjoying the family hunting weekend! We have finished adding the 23/32″ OSB underlayment for the whole 1st floor. Thank you again for all the tips!

      We have the crawl space access hatch door right in the middle of the utility closet (see the attached photo). We are considering gluing down LVP planks on the perimeter + hatch door as well as having a T-molding transition at the closet door.

      1. What type/brand of adhesive is recommended for gluing down multiple planks? We are planning to glue down LVP on the transition areas of stairs as well (see the attached photo).
      2. This closet has a bifold door and its bottom bracket is usually mounted to the floor and the door jamb (see the attached photo). How should we install this bottom bracket with the floating LVP floor?

      Thank you very much!!!

      Oli and Summer

  • Joe

    Administrator
    November 18, 2022 at 9:02 am

    I would just use some pl 400 construction glue to glue the plank down. I will share more on this and how to mount that bracket in a video on Monday.

    • Oli & Summer

      Member
      November 21, 2022 at 1:07 am

      Sounds good and thanks for the recommendation of PL 400. Also, would we need to remove the attached pad before glueing down the planks? The LVP we chose is 5mm SPC Core + 1.5mm IXPE pad.

      Thank you very much!!!

  • Joe

    Administrator
    November 21, 2022 at 8:04 am

    No, the pad can stay on.

  • Joe

    Administrator
    November 21, 2022 at 10:40 am
    • Oli & Summer

      Member
      November 26, 2022 at 12:18 am

      Thank you so much, Joe!

      We started to fill valleys of the new installed OSB underpayment with Ardex. After the first coat, we found that some spots got swelled (see the attached photos). We kept the Ardex as your video showed – not running but creamy. Is this normal? Should we just pop up those spots and patch with the 2nd coat?

      Thanks! Happy Holidays!

      Oli and Summer

  • Joe

    Administrator
    November 28, 2022 at 7:26 am

    Yes it is normal for loose chunks of osb to pop up when filling. Just scrape those off and apply another coat to those areas.

    • Oli & Summer

      Member
      December 6, 2022 at 11:53 am

      Hello Joe, thanks for the confirmation about the OSB with Ardex.

      We finally finished all the floor prep work and started to lay the planks.

      After the 1st several rows, we found that there were some sections of joints having a hairline gap (see the attached comparison photos. You might have to zoom in to see the difference).

      No matter how much we tapped from either side, the gap stayed like that. And most cases are that the two ends are very flushed but the middle section has that hairline gap. Just wanted to ask if it’s normal and if we are being too panicked.

      Also, while walking on these rows, we can hear the static crackling sound here and there. Is it normal for the new installed planks? The OSB underpayment is relatively flat after our prep work.

      LVP plank data sheet link – https://www.christinacollectionflooring.com/_files/ugd/fed42a_49a5d56d01824960acc2deafb95b328d.pdf

      Thanks,

      Oli and Summer

  • Joe

    Administrator
    December 6, 2022 at 12:58 pm
    • Oli & Summer

      Member
      December 13, 2022 at 2:00 pm

      Hello Joe,

      Thanks for the info that it is common to have a hairline with these painted bevels. We tried to carefully clean the tongue and groove for each plank before putting them down and some joints just won’t get any closer. We think some boards’ painted bevels might just be manufactured not super perfectly.

      Also, the planks we use would crack/bubble easily when drilling through. And our baseboards are only 1/2″ and no quarter round. So, we have been avoiding screw down the installed pieces around the new walls but only screwed down temporary scrap pieces (shown in red in the attached sketches). Now, it is the time to connect the kitchen with the hallway. Would you think the following layout can work?

      • We are thinking put two U shape planks to wrap up the 1st wall (south by the hallway) and the kitchen island (see the attached sketches with the label #1 and #2). The LVP we use is 60″x9″.
      • For the 3rd wall (north by the dinning nook), we will be able to screw down scrap pieces there and install backwards later.

      Thank you very much!!

      Oli and Summer

      • Oli & Summer

        Member
        December 13, 2022 at 2:40 pm

        Also, we saw you were recommending the Bessey Adjustable Spacers as an alternative for screwing down. We immediately ordered them on Amazon. But they will arrive next Monday… probably we will be finishing the first level by then 🙁

  • Joe

    Administrator
    December 13, 2022 at 3:20 pm
    • Oli & Summer

      Member
      December 20, 2022 at 5:00 pm

      Thank you soooo much for the reply, Joe! We are almost done with the 1st level – just finishing up the backwards rows now. Then, we will start demo the stairs and level 2. Now we are having some issues with the stairnose purchase and wanted to get your opinions for the following questions.

      The color of the overlapping and flush square stairnoses that we purchased with the LVP does not really match with the planks at all… We are planning to return them and go to a local custom stairnose shop that can manufacture flush square stairnoses out of the planks.

      1. Should we remove the pad before giving the planks to the stairnose shop? The LVP we have is 5mm SPC Core + 1.5mm IXPE pad. We have been reading online that for stair steps, it would be better to remove the pad with a heat gun and rough the back with sandpaper before gluing down the LVP planks/stairnoses. We have seen the attached sample photos online with vs. without the pad. Which way would you recommend? <div>

      <div>2. For the overlapping stairnoses connecting the floating LVP at the top landings, we found this video that shows how to convert the flush square stairnoses to overlapping – https://www.youtube.com/watch?v=IWOo08pre6I&t=137s. Have you done anything like this? The video was using thicker laminate planks. Is it feasible with 5mm LVP planks? Would you have any other magic ways for this situation?</div></div>


      Thank you very much!

      Oli and Summer

      • This reply was modified 1 year, 3 months ago by  Oli & Summer.

  • Joe

    Administrator
    December 21, 2022 at 11:52 am

    I would remove the pad if possible. Have you seen this video – https://youtu.be/v627jfPhNBU

    • Oli & Summer

      Member
      December 21, 2022 at 12:49 pm

      Yes, we watched the video of how to DIY make stair noses out of LVP planks but we like the flush square looking ones like the attached example photo. Luckily, we found a local shop that can help us make them. We will try to remove the pads before dropping off the planks to the shop.

      For the overlapping stair nose connecting the floating LVP at the top landings, we are debating if we should keep the pre-fabricated ones (see the attached photo, the color is pretty off from the 8 plank colors) VS. convert the flush square stair noses to overlapping per this video https://www.youtube.com/watch?v=IWOo08pre6I&t=137s. Have you done anything like this? The video was using thicker laminate planks. Is it feasible with 5mm LVP planks? Would you have any other magic ways for this situation?

      Thank you very much!

      Oli and Summer

  • Joe

    Administrator
    December 21, 2022 at 1:09 pm

    No I have not. Keep in mind, he is Laminate and I dont see that being possible with vinyl plank.

Log in to reply.