Find answers, ask questions, and connect with our community here!

  • Posted by Rick on August 5, 2021 at 11:02 pm

    Hello Joe,

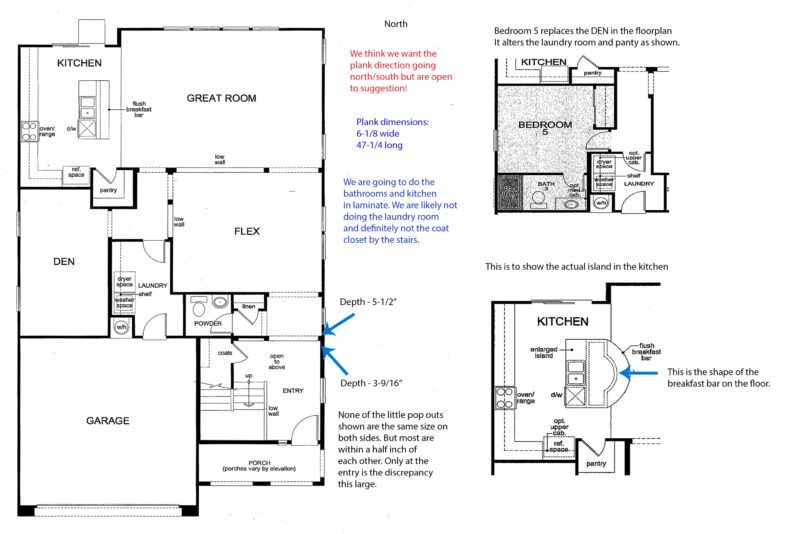
    I pray this finds you all well and that your wife is doing better. I am attaching the first floor floorplan with some notes. The floor plan has shows the bedroom that is an option to replace the den as well as an optional island in the kitchen. I am including some pics including of a plank and a box of planks. We bought this at Costco. It has a pad and we are putting down a 6 mil vapor barrier. We plan on leaving the baseboard up and leaving a 3/8ths gap to install backer rod and silicone per Mohawk’s instructions to be “Waterproof”. Due to this we intend on installing in the kitchen and bathrooms. We will not be installing in the coat closet near the stairs and likely not in the laundry room either…though I would like the look of it flowing everywhere.

    All corners are rounded and have the less than appealing corner piece. As in one of the pics I intend to under cut them all. The entry did have ceramic tile and the corner pieces that met the tile were under cut. The skirting around the Stair Newel Post are already undercut due to the tile being there as well.

    I bought the glue gun and glue sticks as recommended so I could affix the scrap pieces to secure my first few rows as you suggested as I have post tension cable in the slab.

    The kitchen, bathrooms, and laundry room are all vinyl. Should I remove this or go over it with some feathering? I don’t have a problem removing it, I know it is work as I have done it before!

    Please let me know if you need anything else.

    Thank you!

    Joe replied 2 years, 7 months ago 2 Members · 10 Replies
  • 10 Replies
  • Rick

    Member
    August 5, 2021 at 11:10 pm

    A few more pics. The first one shows the first pop out in the entry, this is the one the floorplan mentions that is far shorter on the entry side than the other side. The next 3 show both side of the kitchen counter. The last one shows the wall wrapping around into the “Flex” room. That was to show how the “Low Walls” flow into the next room. I included the plank pics here as I forgot on the first post.

    • Rick

      Member
      August 5, 2021 at 11:21 pm

      My apologies. I added the plank pics and it changed the order. I was not able to edit so this is the text. Please forgive my typos in the first post, but editing is not being allowed at this time.

      A few more pics. The first one shows the first pop out in the entry, this is the one the floorplan mentions that is far shorter on the entry side than the other side and shows the undercuts. 6-8 show both side of the kitchen counter. The last one shows the wall wrapping around into the “Flex” room. That was to show how the “Low Walls” flow into the next room. I included the plank pics here as I forgot on the first post.

  • Joe

    Administrator
    August 6, 2021 at 2:05 pm

    Here you go Rick- http://somup.com/crj1qfYEdp

  • Rick

    Member
    August 7, 2021 at 1:58 am

    Hi Joe,

    Thank you so much! I really appreciate the blueprint. I forgot to mention that we are planning to use the quarter round everywhere.

    I do have a cheater board question. Since I plan on doing the 3/8” gap everywhere and filling it with backer rod and silicone for the waterproofing would I leave the female end on as it is 1/16th shy of 3/8”? I thought with the sharpie line it would be close to 3/8”. One of the reasons for leaving the baseboard on was that it was installed down to the slab and it seemed good to have as a stop for the backer rod.


    I am in Las Vegas so I understand the heat! I lived in Bloominton MN for 4 years so I know what 90-100 with the humidity is like so I feel for you brother!

  • Joe

    Administrator
    August 7, 2021 at 7:45 am

    I would honestly only use a quarter inch gap. Since you are in vegas that plank will not expand contract much. However, make sure you acclimate that laminate for a few days before installing, that will help get the plank to where it needs to be as far as shrinking goes. But yes, if you want a bigger gap, then leave as much of the groove on as needed.

  • Rick

    Member
    September 5, 2021 at 6:34 pm

    Hi Joe,

    I am having a bit of an issue getting my first rows lined up to secure. I have 4 rows down and the the run is about 50’ long. I cannot get this to stay the same distance from the reference line the entire length. I have reset and snapped the reference lines about 5 times, measured many times to ensure the reference lines are the proper distance apart. The distance from the 4 rows always goes off by a quarter inch within the first few planks.

  • Joe

    Administrator
    September 7, 2021 at 8:12 am

    Rick, were you able to get this? Sometimes the floor can have humps in it that can cause the line to go off causing this problem. If the planks are going together tightly, then the plank is probably straight even if the line says different.

  • Rick

    Member
    September 12, 2021 at 9:11 am

    Hi Joe,

    I didn’t. I redid the line from the hallway and tried again. It still goes wonky. I thinks it’s because the hallway is so out of square. I think the larger issue is the first row is a little over 50’ long. It’s off by over an inch by the time I get to the end of the row. However, attempting to straighten that much over 50’ causes the butt joints to separate.

    Being this long, should I build 2 or 3 rows a few planks long as I go straightening them with my line till I get through the 50’. Can I do a couple of rows a few planks long then measure and secure them and do that till I get to the end?

    By the way I have removed the baseboard and will use the hammer drill to secure the floor with tapcons.

    Thanks Joe.

  • Rick

    Member
    September 12, 2021 at 2:45 pm

    Hi Joe, never mind. I got it all worked out!

  • Joe

    Administrator
    September 13, 2021 at 10:03 am

    Ok brother, sounds good!!

Log in to reply.