Activity Feed › Forums › Where should I start – Post drawings and questions › Robby Dillard Blueprint
-
Robby Dillard Blueprint
Posted by robbymdillard on August 31, 2022 at 7:40 pmHi Joe,
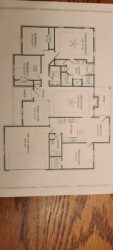
I’ve been going through many of your videos and have decided to tackle this project myself. Attached is my blueprint. Let’s call the front door of the house, oriented south. I’d guess that you’d suggest laying the flooring east and west, which would makes sense. I will also, at some point, want some tips on taking up some glued down wood engineered flooring located in the foyer, dining room, and the hallway. I have tile in the master bath, walk in closets, and linen closet. Also tips on prepping the concrete slab. I have dreaded the prospects of removing the wood and tile with the glue and thinset. I have purchased many of the tools on your recommended list. I have purchased the flooring but it’s not here yet. It’s the Lowe’s Smartcore Pro drop and lock. Yes I purchased it one day before you dropped the video where you expressed dissatisfaction with that product, but my wife wanted that pattern so there we have it. This is a whole house installation minus the garage on a concrete slab. I look forward to working with you on this project!
Joe replied 1 year, 7 months ago 2 Members · 14 Replies -
14 Replies
-

Thanks Joe for the insights and quick response, very much appreciated. Answers to some of the questions you had are as follows:
I am located in Alabama. I also will be working in my spare time, nights and weekends to get this done. So I it will take me a while.
I will choose the east west layout starting in the dining room (southeast corner). Kinda concerned how the planks will fall into the bedroom thresholds, but we’ll get into that later. Oh and that glued down wood flooring is also down the hallway.
I will have you make one minor-ish adjustment to the blueprint and those are the two small areas in the hallway that appear as voids. One is at the end of the hallway and the other is at the entry of the master bedroom. They are actually small closets. Sorry for failing to mention that initially.
Those little squares you saw that your thought were pillars, there’s only actually one and it is a pillar out into the room. The ones pictured along the wall are not there.
My furniture situation. Well, there’s plenty of furniture, but I should be able to move it all around in the rooms to where I have half the room to work with.
Thanks for the info on the hammer drill and bits. I have many tools already so no problems there. And thank you for the honesty on the labor it’s going to take on the wood floor. I suspected that.
The plank should be arriving in a week or so.
I already have a circular saw and oscillating saw and hammer drill.
I have purchased the following tools and accessories for the job.
– Bullet Tools Striker XXL Tapping Block
– Bullet Tools 712HD Professional Heavy Duty Pull Bar and Pry Bar
– Oscillating Tool Blades
– ProKnee Knee Pads – been needing knee pads for years on various tasks, but have never purchased.
– AdTech Glue Gun
– FastenMaster Glue Sticks
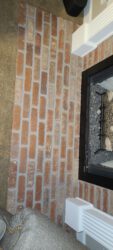
Attached are photos of a few areas of the house. Included are photos of the master bedroom, master bath, hallway, foyer, and breakfast area (vinyl).
Follow on questions and comments:
1. I’m curious, is there any merit to LVP needing a acclimation period inside my home prior to laying. In my case it doesn’t matter because it’s going to take me a while to demo and floor prep, just curious.
2. I know you know this, but it’s for my edification. We can’t assume the start point wall will be square to the end point wall and the locking system won’t allow for minute corrections between start and end points but we do want the flooring to appear to run parallel to all walls. I will be interested to know how to achieve this.
3. I will be removing the tub in the master bath, filling the void with concrete, capping the plumbing in the event I decide to put a free standing tub or if I ever sell, someone else still has the option.
I will definitely take a look at the videos you mentioned.
-
This reply was modified 1 year, 7 months ago by robbymdillard. Reason: Clarity
-
This reply was modified 1 year, 7 months ago by robbymdillard.
-
The photo of the dining room does not show the pillar, but I DO have one that I am installing.
-
This reply was modified 1 year, 7 months ago by
-

Thank you for all the info and I will have this to you tomorrow. I will answer your questions in the blueprint video at the beginning of the video.
-
The more I study your video, the more I am leaning towards beginning in the breakfast area (the room at the north end of the blueprint).
-
-
Hey Robby, I can do that. For the third day in a row I am having some internet issues. I think they are working on upgrading the grid. I still have not gotten to your print but will as soon as I can ..
-
-
Yes sir, yes sir! Thank you, looking forward to going through the video. I am finishing up the master bathroom demo tonight. Hasn’t been too bad, just takes time and patience. I will tell you I purchased the curved chisel for the hammer drill and it worked well. Have found that to remove the cement, it works best to turn the curve facing downward. Talk later Joe. Have a great week.
-
-
Joe,
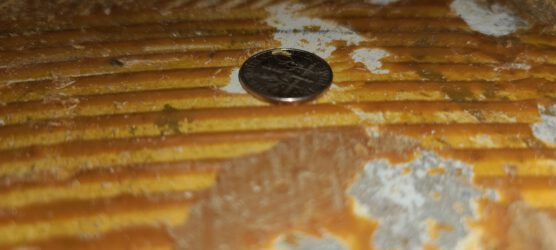
I removed a small area of the glued down flooring and want to know your thoughts on the glue that remains. I’ve provided some “ant” level pics for you to let me know if something further is required to remove the glue or will it be ok to lay the laminate over it.
Thanks,
Robby
-
Good morning Joe. Demo has been going great so far. Although there is some sweat equity in that, it wasn’t as bad as I had imagined, so I am thankful for that. Attached are pics of the master bath with tile and thinset removed and the dining room and hallway with almost all wood flooring removed. I should finish it all up tonight. Next up, removing carpet from the great room, identifying any and all low spots/humps and applying feather finish (Henry’s 549). I have watched your videos on how to identify and apply the feather finish where needed. I feel pretty comfortable with that process.
A note about getting thinset up from under the tile. I actually used the curved Bosch chisel I purchased from Lowe’s. It worked great with the Bosch Bulldog Extreme hammer drill. It just requires technique with the correct pressure, angle, and speed. But if you hold the curved chisel upside down, it makes the removal of the thinset easier.
Question: For spots that require the feather finish, will there be any adherence issues that would require me to remove the glue prior to applying it?
Thanks and have a great weekend.
-
No. Just be sure to get all of the dust off and you might want to give the areas a sponge bath first, let it dry and then apply the floor fill.
Log in to reply.