Activity Feed › Forums › Where should I start – Post drawings and questions › Lyons Blueprint – 2nd floor
-
Lyons Blueprint – 2nd floor
Posted by Mike on December 10, 2022 at 10:26 amHi Joe,
Thanks for this great site. Watched a lot of your videos on YouTube but I wanted to do this right so I spent the extra money to get your input and expertise.
Using Lifeproof Waterproof Rigid Core Sterling Oak: 8.66″ x 47.64″
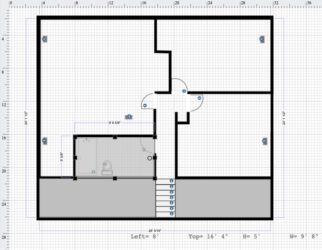
Gauge: .276″I’m installing the entire 2nd floor, except the bathroom (greyed out). Also have stairs I’d like to do going down to the main level. My big question is really where to begin since there is a hallway to the stairs and I’d really like to do the whole floor with no transition strips. Attached is my drawing of the layout. I can add any pictures if needed.
Thanks in advance,
Mike LyonsJoe replied 1 year, 3 months ago 2 Members · 14 Replies -
14 Replies
-
-

Thanks Joe for the video. I’m here in Cincinnati, so not quite as cold as you. 40’s and 50’s at the moment. Actually pretty warm for this time of year.
I may post some pictures. The video makes sense. I was thinking North to South layout. I still need to watch the rest of your videos and that will take some time, so I’m going to wait to post any questions until I watch those. Appreciate your help.
God bless,
Mike
-
-
Hey Joe, I have one question that just doesn’t seem to be clicking in my brain. You said measure in the hallway from bedroom door to door (for N to S layout) to make sure you don’t have a hard cut around the frames. Then snap a line in the hallway to make that the line you work from. I get all that. Now…
When you measure back into the master bedroom (left side) to know where to start so that the plank falls right in the hallway, how do you know where to snap a line in the bedroom off the line in the hallway? For some reason I’m just not comprehending that part! (And I watched the videos about the 10 planks and where to start). I just don’t know where to snap off a line in the bedroom or the logic of how far from the hallway line it should be. Does that make sense?
Thanks in advance,
Mike -
-
Thanks Joe. That makes perfect sense. I have just a few more questions:
1) I have a couple of floor vents near the wall in the master bedroom. Looks like from your other videos the best thing is to start a couple of planks out from the wall and then work backwards later to be able to cut around those and finish the last few rows. Is that right?
(The master bedroom with the vent is the big room on the left in the blueprint. This is old plank in the picture.)2) Here’s a couple of pics of the door frames leading into the hallway. When you say measure from the door frame, do you mean the middle of the frame? (That makes the most sense.) Is this weird junction of the two door frames going to be a pain to work around? I’m guessing you would lay a row all the way into the other bedroom and then use a cheater board to mark the frame cuts. (I still need to undercut these frames.)
**The master bedroom doorway is the picture with just one door frame on the top of the pic.
***The door frames that meet together are the other 2 bedrooms, across the hall from the master bedroom.3) Here’s a picture of my planks and part of the instructions. I’m not sure how to tell how the short edges fit together because they show hitting it with a mallet. Is there a way to tell which kind I have? It looks like they are saying to put the long edge in first then hit the short edge with a mallet to lock it in, but I want to be sure.
Thanks in advance.

-
-
-
Appreciate it, Joe. That all makes sense. May be starting this project in the next week if things go according to plan. If I have any other questions I’ll let you know! Merry Christmas to you and your family.
-
-
-
Hey Joe, hope you had a good Christmas. We had -5 for a high here with -30 wind chills. I’m sure it was worse where you are!
I have some actual numbers on the space between the 2 door frames in the hall. I’m still trying to make sure I’m doing this right, so I wanted to post the actual numbers and make sure I’m on the right track.
From the sheetrock in the corner to the other door frame (just like you showed in the video) the measurement is:
65″.
32-1/2″ is the middle.
Planks: 8-5/8″.
3 planks gets it to 25-7/8″ from the sheetrock by the frame of the master bedroom, meaning its another 6-5/8″ to the line. So, adding a 4th plank goes 2″ beyond the line.I guess I’m asking should I move the planks back 2″ into the door frame, measuring 6-5/8″ from the wall for the first line (that goes into the master bedroom)? I’m trying to make it make sense so the bedroom across the hall has the plank in the middle of the door frame as well. I know this isn’t complicated but I’m just not getting that part. Thanks in advance.
-
-
-
This makes PERFECT sense. I think I got it now. Thanks, Joe. I was too worried about trying to make the plank end exactly in the same spot on both door frames. I’ll measure it out when I get home and hopefully we’ll be ready to roll on the install this Friday-Monday.
-
-
-
Hey Joe, Hope all is well. I finished laying all the flooring on New Year’s weekend, and then went on vacation lol. Everything worked out great. I just have a few questions in the finishing…
1 – When you put back up the trim moulding, do you do any caulking around the bottom edge? Either way, do you recommend adding quarter round as the last step?
2 – For the top of the stairs: I found out that Lifeproof doesn’t have the bullnose transition like you mentioned in your video for the very top step. Any recommendations?
Once I finish I’ll send you some pictures of the finished floors. We’re really happy with everything and me especially with how the installation went!
Thanks!
-


Log in to reply.